

I’m BAAACK! (And it’s about time ain’t it?) We finally found my big girl camera charger and I was a picture takin’ fool today because I have been waiting anxiously to show you the “After” photos from my Laundry Closet Make Over.
If you’re wondering what the heck I’m talking about, start HERE.
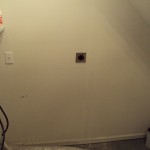
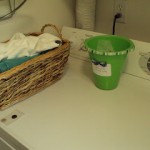
Let’s take a peek at the dismal space we started with:


*Womp Womp*
See how sad? Well not anymore! Take a look:

Ta Da! I am literally in love with my laundry space now.


These baskets were in our bathroom in our apartment, so I gave them a good clean and then added paint chip tags I cut out with a punch. Then I hand stamped the tags letter by letter and simply attached them with clothespins from my stash that I dressed up with some coordinating ribbon from the dollar bin at Michaels.

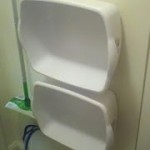
These jars were used in our old laundry room, but they were labeled with red vinyl lettering. Now, I used strips of waffle weave fabric that I cut using some leftover waffle weave from my scrap fabric. I used the same paint chips and stamps to make labels for each one. The jars are my most used laundry items and within easy reach on the lower shelf.

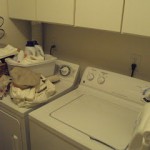
Between the dryer and the wall there was a lot of wasted space so I picked up an inexpensive cream colored shelf from Home Depot to house my detergent and stockpile of laundry supplies. Then I tucked my step stool in beside it. My drying rack also fits well in here when I’m not using it.

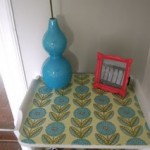
The light fixture used to be just a bare bulb. Hubby changed it out to this beauty that only cost $25!

Oddly, the thing I think I’m most proud of is the trashcan. I had seen on Pinterest another blogger had hot glued twine all around a cheap plastic bin. I had already bought a mesh can that I wasn’t thrilled with, but for $2.50 from the Target Dollar Spot, I was willing to live with it. Once I saw that pin, I knew I had to transform it. I didn’t even need to glue as I went! I just shoved the loose end of twine through one of the holes in the mesh and wound it around. Once I got to the end of the bin, I shoved the newly snipped end into a hole at the base and used a big ol’ glob of hot glue to secure the knot! With a bag inside it, you can’t tell it was ever mesh!

I knew I wanted some artwork for the space, but I didn’t want to spend well, anything, so I used my Cricut to create coordinating laundry artwork using the Country Life cartridge. The middle piece is a Bible verse that I still think I’m going to tweak so it looks a little nicer. If you’ve been around since the beginning, you might recognize those frames – two of them were dry erase boards I made to use on our apartment fridge. 😉
And there you have it. What’cha think? I hope it was worth the wait!
I’ll be pulling together a resource list (and will link to it here) soon for paint colors, washer/dryer, etc in case anyone is interested.
This post is linked up at the following parties:
Thrifty Decor Chick’s October Before and After Party (see sidebar for button)
Hookin’ Up withh House of Hepworths – see sidebar for button


1 Comment
Everything published made a ton of sense. However, think
about this, what if you composed a catchier title?
I am not suggesting your content isn’t good., however suppose you added a post title to possibly grab a person’s attention?
I mean “Laundry Closet Make Over Part 2 – The After” is kinda plain.
You might glance at Yahoo’s front page and see how they write post headlines to get people to open the links. You might add a related video or a related picture or two to grab people excited about everything’ve got to say.
In my opinion, it would make your website a little bit more interesting.
my blog; weight loss plans